Pin It

Tuesday, July 9, 2013

Cards touch the heart

When did I move from purchasing cards to making cards? That is a question I do not know the answer to. I love personalized gifts. I find difficulty in registries. How do you make hangers personal? I have always at least tried to find a way. Maybe buy all the hangers from the registry then add in matching t-shirts or cheesy pajamas? There is always a way to make a gift personal. And why not start with a homemade card. I must say, the cards I have been making this year are much beyond what I was making last summer. I've stepped up my game. It is my time to relax. Making a card for a loved one really clears my mind... Therapeutic, if you will.

For me (Tenisha), sending a homemade card says a lot when living over a thousand miles away from home. And I have had every excuse in the book to send a card recently: brothers birthday, brothers girlfriends birthday, parents anniversary, graduation, mothers day X 2, brothers anniversary, sisters anniversary, another graduation. My card table has been exactly that lately, a card table.

Here are just a few recent cards. Maybe it will give you inspiration to mail off something extra special.

Buttons with a simple stamp
sewing a card adds a unique touch
same stamp, different colors.

Sunday, June 23, 2013

Caley {maternity}


Recently I moved to a new state so I left behind all my photography clients in my home town. Last week I went back home to go to a wedding and to visit for Father's Day so I scheduled a photo shoot. This was my first real maternity photo shoot, the two before were my sisters, I guess they're real too ;). Caley was so much fun to photograph. She has such a fun personality and is a genuine person. I am absolutely in love with these pictures and the style she chose for them with her outfits. They're so unique and really make the images perfect. 


Monday, June 17, 2013

banana + coconut + rum + lime = banana bread?!

I baked cookies the other day, and as soon as we ran out I decided I MUST have another sweet on hand for easy consumption. Enter: Coconut banana bread. I searched Pinterest (because where else would I look?) for a new banana bread recipe, and found a recipe for coconut banana bread. YUM! I then did another search to see what other coconut banana bread recipes were out there (this time using good ol' Google), and found this one. Both sound/look amazing, so I combined the two using what I had on hand. Here's what I used:

2 cups all-purpose flour 
1 teaspoon baking soda
1/2 teaspoon salt
1 cup granulated sugar 
1/4 cup butter, softened
2 large eggs 
2 cups mashed ripe banana (came out to be 4 bananas) 
1/4 cup light coconut milk
3 tablespoons dark rum 
1 teaspoon vanilla extract
1/2 cup flaked sweetened coconut, plus 1 tablespoon
Cooking spray
1/2 cup powdered sugar
1 1/2 tablespoons fresh lime or lemon juice
Preheat oven to 350.
Mix the flour, baking soda, and salt together in a bowl, set aside.

Beat together the butter and sugar in large bowl. Add eggs, beat together.  Add banana, milk, rum, vanilla. Add flour mixture, beat on low. Stir in 1/2 cup coconut. Spoon batter into a 9 x 5-inch loaf pan coated with cooking spray. Sprinkle with additional 1 tablespoon of coconut. Bake at 350° for 50-65 minutes.

Combine powdered sugar and juice and drizzle over warm bread.


Monday, June 10, 2013

Canvas Art


I love to have little art pieces around my room (since I don't have my own place yet). I especially love the pieces when they are something I have created, it makes my room more personal, more me. I saw one say this in a store and thought, "I could make that", like I do when I see many things. But this is one I actually tried and succeed to make. It only took me four simple steps! 

what you'll need: canvas (made or bought), spray paint, and sticker letters (any size or font). 

Step 1. Apply Letters: you can place the letters any which way you would like. Write out a whole poem or just put one letter on each canvas to spell out a word, the sky is really the limit with this DIY.
Step 2. Spray First Layer of Paint                
Step 3. Double Coat: this step is optional, if you like the first layer color of the paint then you don't HAVE to do this one. I just wanted to really be able to read my words as I used a lighter color of paint.  
Step 4: Remove stickers: Once your paint has dried you can remove all your letters and TADA! your final product. 
(for extra spice you can paint your canvas a different color before starting the four step process so your letters really pop.)


Song of Solomon 2:16 is currently my favorite verse. "My beloved is mine and I am His." 

-Tori xoxo


Tuesday, June 4, 2013

Birthday Chicken Lasagna

Birthdays are special. They have been a big deal for as long as I can remember. The only "bad" birthday experience I can remember is when I turned nine years old. For my nine year old birthday all I wanted was a puppy. ANY puppy. My birthday is in December, and in November my mom took us kids to the dog shelter, "just to look". We looked and looked. Then in a round crate we found her. My puppy. She was there with her siblings, and I wanted her. I needed her. And my mom agreed. We left the dog shelter with my birthday present, a month early. Doesn't sound like a "bad" birthday, right? Here is where it got bad...For the next month my mom kept warning me that I already received my birthday gift so I wouldn't be receiving any presents. At the time, this was fine. I had my puppy. I loved my puppy. Then came my birthday, December 8th. Puppy, a cake, and my family. I cried and cried. I was crushed. She really meant it, she really meant no presents. And all along she thought I understood. Later on my birthday, each of my siblings wrapped up a present from the dollar store so I would have something to open. It made the "bad" experience much better. Everyone deserves a special birthday.

This Birthday Lasagna is one I made for my husband back when he was a fiancĂ©. I wanted to spoil him, like everyone deserves on their birthday. As many of my recipes go, lots of research went into this lasagna. I wanted a chicken lasagna that was semi-healthy. I knew this would impress the man that put a beautiful ring on my finger. I found a veggie lasagna and made it my own. 

Since that birthday several years ago, I have made this lasagna many times. It is time consuming, so many times I like to make it for special occasions (birthday, anniversary, etc.). 

This time around was for Valentines day. We decided to stay in, rather than fight crowds, and have a dish we love. 

Because the Love day fell on a weeknight, I split the duties of the lasagna into two nights. The night before I cooked the chicken breasts, sliced everything, and thawed the spinach. 
This was the first time I split up my work for this lasagna into two days. It will not be the last. It made the lasagna feasible for a weeknight meal. It is about a two hour process in a single night, but it is worth it. And if it is just you and another ... it is left overs for days.

The second day consisted of toasting the pine nuts, making the sauce, cooking the noodles, mixing the filling, and layering (then baking and enjoying, of course). 
And the final product ...

You will need:
Sauce-
2 tablespoons of butter
1 tablespoon of oil
3 tablespoons of flour
3 cups of milk
1/2 cup of basil, chopped
1/2 cup of Parmesan cheese, shredded
1 clove of garlic, finely minced
salt

Filling-
1/3 cup of pine nuts, toasted
(2) 10 oz packages of frozen spinach, thawed and well drained
15 oz of ricotta cheese
2 cups of Mozzarella
1 1/2 cups of Fontina cheese
3/4 cup of Parmesan cheese
1 egg
1/4 teaspoon of pepper

To finish-
12 lasagna noodles, cooked according to package directions
3 chicken breasts, cooked and sliced
1 zucchini, sliced
8 oz of mushrooms, sliced

The process:
Preheat oven to 375
Sauce- In a 2qt pot, melt butter over medium head. Add oil and stir in flour until absorbed. Add milk, stir constantly until boil. Remove from heat; stir in basil, Parmesan, garlic, and salt. Cover and put aside.

Filling- In a large bowl, mix together pine nuts, spinach, ricotta, Parmesan, 1/2 cup of Mozzarella, Fontina, egg, and pepper.

Assemble- Spread one cup of the sauce on bottom of 9 X 13 baking dish, layer with four noodles. {Spread half of the filling over the noodles, add half of the chicken and vegetables, then half of the remaining sauce} - Repeat what is in the brackets.
Bake 30 minutes, add remaining one cup of Mozzarella and bake an additional 20 minutes. Let stand 15 minutes before cutting.

Friday, July 6, 2012

Bake a Mug

Bake a Mug:


I have seen on my Pinterest lately a few post about writing sharpie on a mug and then baking it, like these, here and here, so I thought I would try it out myself. 
Items needed: Sharpie of any color(s) and a mug.


The steps are very simple: 

1: You draw or write whatever you desire on your mug. I LOVE the Hunger Games and saw this post also on Pinterest and thought it would be perfect for a mug, so I drew it on my mug. My friend suggest a little twist on the wording to make it more coffee mug appropriate.

"May the Odds be Ever in Your Flavor."


2: Once you finish your master piece or beautiful choice of words to go on your mug you simply place it in the oven at 350 degrees and bake for 30 minutes. 

Remember: let the mug cool completely in the oven before removing. :)

Hope you enjoy this quick and simple DIY

-Tori 


Sunday, May 20, 2012

Let us sew for baby's feet

There are no babies in our family (yet)*, but with two married siblings it is bound to happen at some point. What better time to start crafting baby items than before babies are even in the picture?
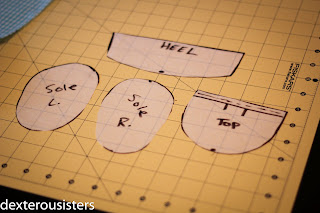
We have managed baby headbands, and have even tested out a baby quilt (more on that later), but these little booties are just too darn cute. With a stock pile of three pairs (as I type t-h-r-e-e I realize it is not that great of a stock pile) the color combinations and button possibilities are endless. I prefer to practice, if you will, before I make any sort of "I-can-sew-baby-shoes" comment. I'd like to think three has put me where I can be more confident.

These are simple, and from an awesome blog I found online after googling "baby booties". Complete with a pdf including each step in detail and patterns. Get creative, they are fun to make! Here are my latest.


Some tips:
  • Make the heel bigger than the pattern. I have found after all the ironing, folding, and sewing it is smaller than I wished it was (all three times and I still didn't remember this tip). 
  • I could not find "bonded fleece" at my fabric store, so tried sewing two layers of fleece together, then just started using one layer of fleece. For these little feet, one layer seems fine to me, although I am still on the search for bonded fleece. 
  • For the coordinating fabric, choose something soft. Quilters cotton just doesn't seem soft enough once the back is bunched tight with the elastic (and this tip comes from one of my husband's friends who is an Officer in the USMC ... we all want babies footsies to be cozy).
  • Speaking of elastic, I find using a tiny safety pin is easiest in moving the elastic through the slits. 
  • Buttons complete these shoes. Don't shy away from the buttons. 
  • These are addicting and a great way to put those fabric scraps to use. Just please adhere to Joanna's comment on selling the shoes, if you decide to go that route. 
*This was typed prior to my brother and sister-in-law announcing their baby news. Yay yay yay!! for a baby in the family. That baby will have enough booties to last a life time.