Pin It

Friday, July 6, 2012

Bake a Mug

Bake a Mug:


I have seen on my Pinterest lately a few post about writing sharpie on a mug and then baking it, like these, here and here, so I thought I would try it out myself. 
Items needed: Sharpie of any color(s) and a mug.


The steps are very simple: 

1: You draw or write whatever you desire on your mug. I LOVE the Hunger Games and saw this post also on Pinterest and thought it would be perfect for a mug, so I drew it on my mug. My friend suggest a little twist on the wording to make it more coffee mug appropriate.

"May the Odds be Ever in Your Flavor."


2: Once you finish your master piece or beautiful choice of words to go on your mug you simply place it in the oven at 350 degrees and bake for 30 minutes. 

Remember: let the mug cool completely in the oven before removing. :)

Hope you enjoy this quick and simple DIY

-Tori 


Sunday, May 20, 2012

Let us sew for baby's feet

There are no babies in our family (yet)*, but with two married siblings it is bound to happen at some point. What better time to start crafting baby items than before babies are even in the picture?

We have managed baby headbands, and have even tested out a baby quilt (more on that later), but these little booties are just too darn cute. With a stock pile of three pairs (as I type t-h-r-e-e I realize it is not that great of a stock pile) the color combinations and button possibilities are endless. I prefer to practice, if you will, before I make any sort of "I-can-sew-baby-shoes" comment. I'd like to think three has put me where I can be more confident.

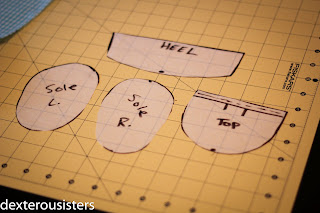
These are simple, and from an awesome blog I found online after googling "baby booties". Complete with a pdf including each step in detail and patterns. Get creative, they are fun to make! Here are my latest.


Some tips:
  • Make the heel bigger than the pattern. I have found after all the ironing, folding, and sewing it is smaller than I wished it was (all three times and I still didn't remember this tip). 
  • I could not find "bonded fleece" at my fabric store, so tried sewing two layers of fleece together, then just started using one layer of fleece. For these little feet, one layer seems fine to me, although I am still on the search for bonded fleece. 
  • For the coordinating fabric, choose something soft. Quilters cotton just doesn't seem soft enough once the back is bunched tight with the elastic (and this tip comes from one of my husband's friends who is an Officer in the USMC ... we all want babies footsies to be cozy).
  • Speaking of elastic, I find using a tiny safety pin is easiest in moving the elastic through the slits. 
  • Buttons complete these shoes. Don't shy away from the buttons. 
  • These are addicting and a great way to put those fabric scraps to use. Just please adhere to Joanna's comment on selling the shoes, if you decide to go that route. 
*This was typed prior to my brother and sister-in-law announcing their baby news. Yay yay yay!! for a baby in the family. That baby will have enough booties to last a life time. 

Tuesday, May 1, 2012

Senior and Miss Nebraska National Miss

I (Tori) had a fun week with two photo shoots. A senior (little late) and then Miss Nebraska National Miss. They were both so much fun to work with! 

This is my first real time shooting a boy. At first I was a little hesitant, how are you suppose to pose a boy!? But, it wasn't as hard as I thought it would be. He cooperated very well, and it helped that he had some props :-) 


Miss Bri is incredibly beautiful inside and out. She truly was fun to work with. We had such a fun time on this shoot and went to a new location, which was beautiful. I was honored to have the privilege of taking her pictures. Hopefully you'll see her as Miss America someday :-)  


Saturday, April 28, 2012

Weave it through, shirt


In my (Tori's) professional fashion opinion, I believe imperfection is perfect. A shirt with asymmetrical sleeves, a skirt with a bold zig-zag seam ... both scream "individuality". That is exactly what this shirt is. It is your individual twist on a sweater of your choice, and oh, so simple to make create.

What you'll need:
any type of shirt/sweater your little heart desires (mine is a Thrift Store find)
scissors
 a few strips of fabric
needle & thread
sewing machine (if you decide to hem the sleeves)
step 1: Cut off the collar of your shirt
Step 2:(optional) Fold shirt in half, and cut the sleeves to the length you love.
Now, here comes the part where you make it your own. 

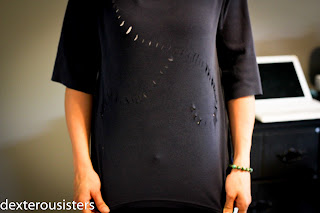
Step 3: Pinch your shirt, take the scissors and cut a little slit in the shirt. Continue to cut slits into the desired design. 
Step 4: Take your favorite fabric and cut a thin strip (you may need a few strips depending on your design, I used two)
Step 5: Take your fabric strip and weave it through the slits in your shirt.
Step 6:Take a needle and thread. Stitch the ends of each piece of fabric.
Waaaaa-la! There is your simple weave it through, shirt! 

Note: If you want to hem the sleeves, now is the point in which you would break out the ol' sewing machine and hem away. I left mine with a fraying look, more of that "individuality" I love so much. 


Monday, April 23, 2012

Pear and sausage pizza. Yeah, I said it.

I desire to be original. An original teacher, student, wife, mother, cook, television viewer, dog owner. Okay, I just want to be original in everything I do. But with being a new wife, my recipe box is mostly full of Real Simple recipes, Food Network recipes, various blog recipes ... not many that I can call "mine".

For now, I have two. A pear, sausage pizza and a chicken lasagna. The lasagna has a heartfelt background story and is making me drool with just the mention of it. I will save that one. Fortunately, the pizza is just as tasty and even a little less time consuming.

The background story.
We love pizza. Eat it at least once a week. Sometimes homemade, sometimes at our local pizza spot. Homemade is typically the choice from both parties, but is typically a recipe from online or a mimicry of one we have had in a restaurant. Due to this love of pizza, we received a beautiful pizza cook book from John's sister for our wedding. It truly is beautiful. In the book, there is a pear and sage flat bread. My husband is a "meat man" so I knew just pear and sage would just not cut it. I knew sausage was the answer for pear. Fruit and breakfast meat is just a perfect couple in my mind. Thus the research started. I am a high school English II teacher ... research is a part of my daily job. 

"What cheese pairs best with sausage?" Verdict: Sharp white cheddar and blue. The answer didn't quite come this speedy. 
"What sauce pairs best with sausage?" Verdict: No response, well marinara, but that wasn't cutting it. We had to get creative here.
"What the heck is aioli?" Verdict: It is not as hard as it sounds. After only hearing it from Bobby Flay's mouth I was nervous. But we've now made it multiple times using our blender. 

Post research was a time of trial and "error", although error is far from the right word, because each time we have made this it has left us with no left overs.

Beauty was born.


Pear and sausage pizza recipe:

You will need:
  • One pear, thinly sliced
  • Turkey sausage, cooked and crumbled (3/4 pound) I use the ready to go Jimmy Dean crumbled sausage
  • One pound of pizza dough
  • Half a cup of homemade aioli (OR olive oil mayo with two to three garlic cloves) 
  • Fresh or dried sage
  • Sharp cheddar cheese, shaved or shredded (five ounces)
  • Blue cheese, crumbled (three ounces)
  • Honey to drizzle (one and a half teaspoons)
After rolling out dough (I always make this a thin crust pizza), assemble in the following order:
Aioli, sharp cheddar, pear slices, sausage, blue cheese, sage, then a drizzle of honey

Bake at 425-450 (depending on your cookware/stoneware and oven) for 12-15 minutes. 

Indulge.


Saturday, April 21, 2012

What's better than homemade pizza dough?

The answer is nothing. You can make it as fluffy as you like it, or as crispy as you like it. Crispy is where my heart has always been.

Over the years, I (Tenisha) have been searching for the perfect pizza dough recipe. Not all pizza dough recipes are the same (much to my own surprise). And this is what I use. Not saying it is perfect, but for my Kitchen Aid, my oven, my Pampered Chef stoneware, and my taste buds ...

it is perfect, until I find something to replace it with. It can be tweaked to fit your toppings (i.e. fresh chopped cilantro, a little drizzle of honey, Italian seasoning, Oh! the possibilities). Here it is, simple in every way.
Pizza Dough Recipe

You'll need: 
Two teaspoons of olive oil
One packet of active dry yeast
One cup of water (plus more, if using wheat flour)
Two and a half cups of flour (I use a mix between wheat and unbleached/un-enriched white)
Half a teaspoon of salt
Teaspoon of any extra seasoning (in above photos I use dry sage)

Warm up water on stove or in microwave (just warm, not hot). Dissolve yeast in warm water. Add in salt, oil, and any additional seasoning(s), then half a cup at a time, add in flour while on speed two on your Kitchen Aid.